|
|
|
|
This project is about designing and building different ergonomic
electric guitars. They generally fall into two categories. The first includes guitars
designed to be played in the "classical" seated
position with the guitar resting on top of both legs, and the
second is designed to be played in the "folk"
seated position with the guitar resting only on the back leg.
Here are the design goals and
constraints for the two ergonomic electric guitar styles discussed
on this page. 1.
The player must be able to play with their back straight and
feet flat on the ground
2. The guitar should be in the same position relative to the
player's upper body whether playing sitting or standing
3. The weight of the guitar must rest primarily on top of the player's
leg(s) when they are playing sitting.
4 a. The guitar designed to
be played in the classical position must support tilt
angles of at least 30 to 45 degrees.
4 b.
The guitar designed to be played in the folk seated position
must support tilt angles of at least 15 to 30 degrees (but up to 45 degrees would be better). As
part of this ergonomic electric guitar project, I looked at a
number of commercially available guitars and applied kinematic
and geometric principles to develop objective ways of
comparing their designs. That turned into a lengthy discussion
around electric guitar ergonomic
analysis if you are interested.
|
|
|
|
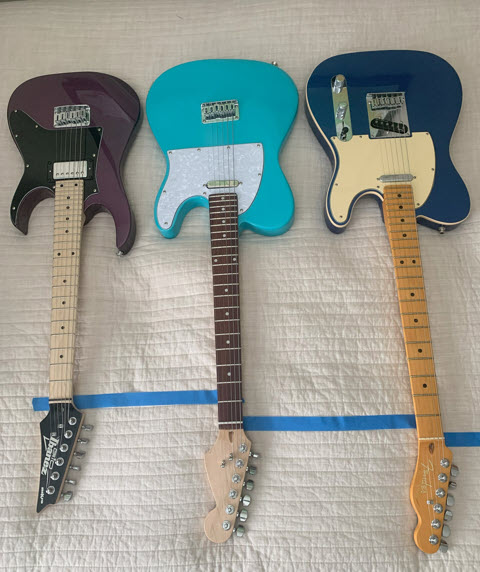
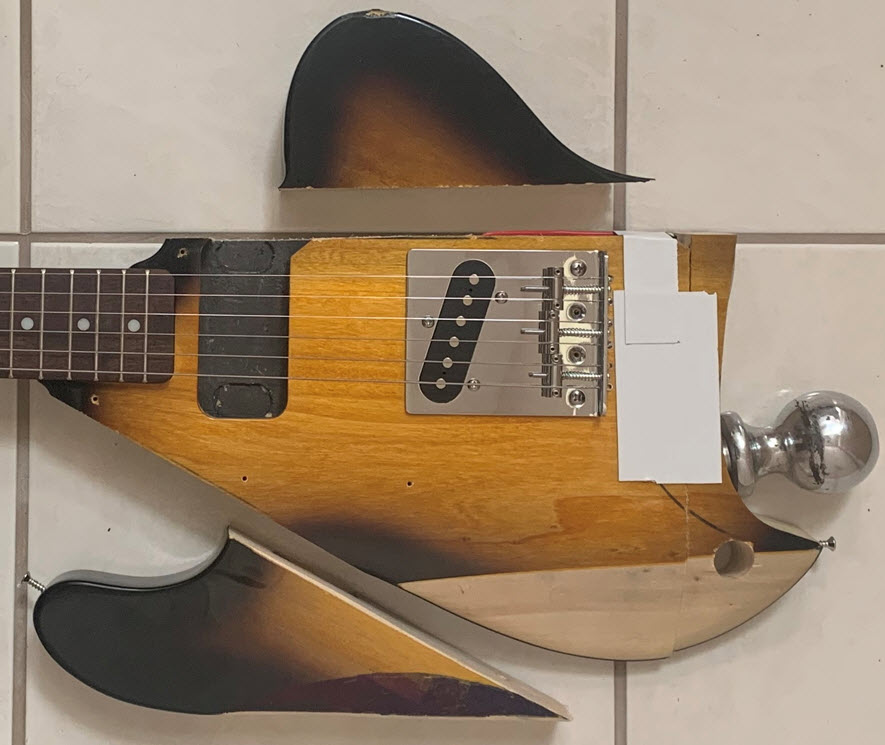
Wave T Ergonomic Electric Guitar
|
The Finished Wave T Ergonomic Electric Guitar
|
|
|
|
 |
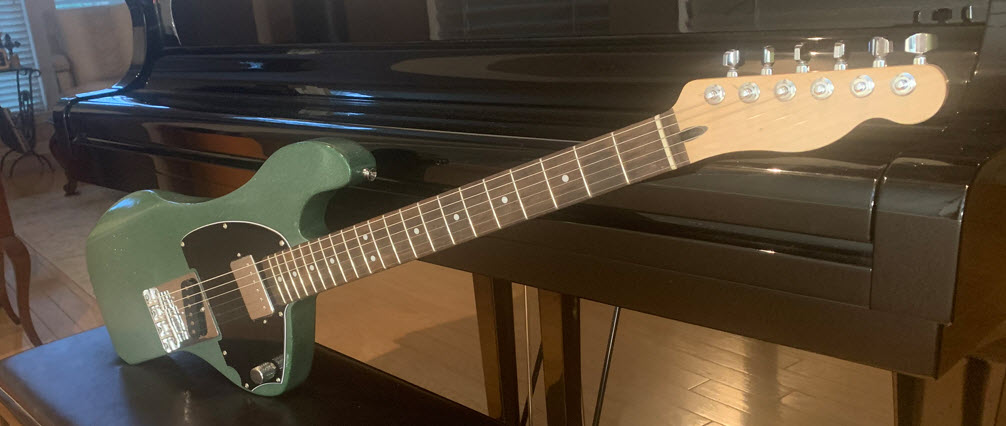
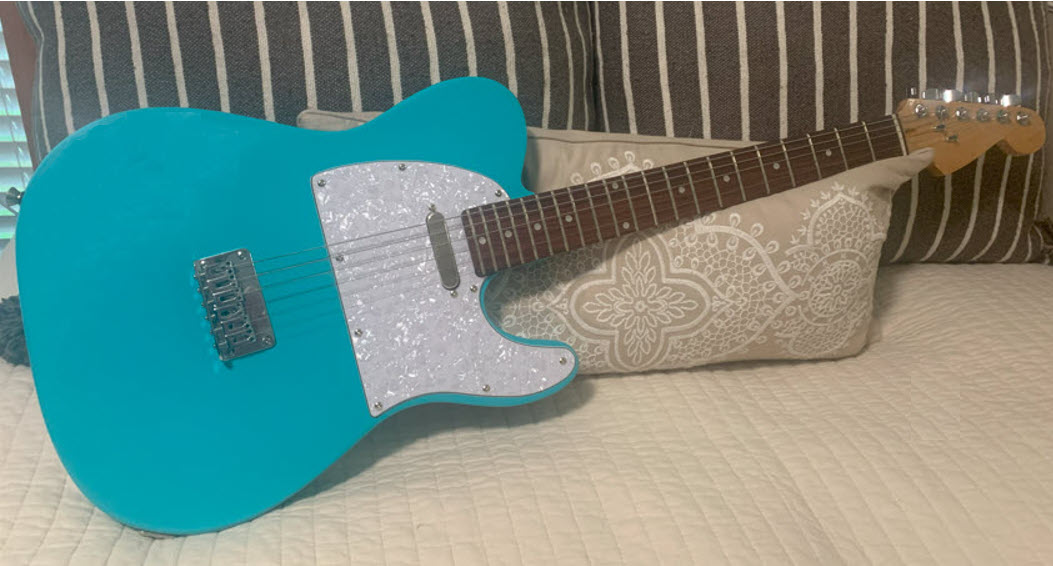
Here's the end result of the first ergonomic
guitar that is part of this series of projects. I called the guitar
"Wave T." The "wave" part of the name is because
the four corners of the guitar look to me a bit like
different shapes of ocean waves (and I had to come up
with something to put in front of "T"). Of course,
the "T" part of the name stands for T-style, aka Telecaster.
The economics are why many guitar
builders start with the T-style platform. In the words of
Steve Klein (one of the most respected ergonomic guitar
designers and builders), "it just
makes the guitar a more affordable instrument." At the
time, Mr. Klein said this, he was talking about his ergonomic
T-style guitar the "sTele." The sTele uses T-style
controls, pickup layout and bridge; but the sTele is at a
"whole nother level" of sophistication relative the
Wave T. If you would like to
learn about electric guitar ergonomics, I suggest you study
Mr. Klein's guitars. There are also youtube videos where he
talks about his views on ergonomic guitars.
|
|
|
|
|
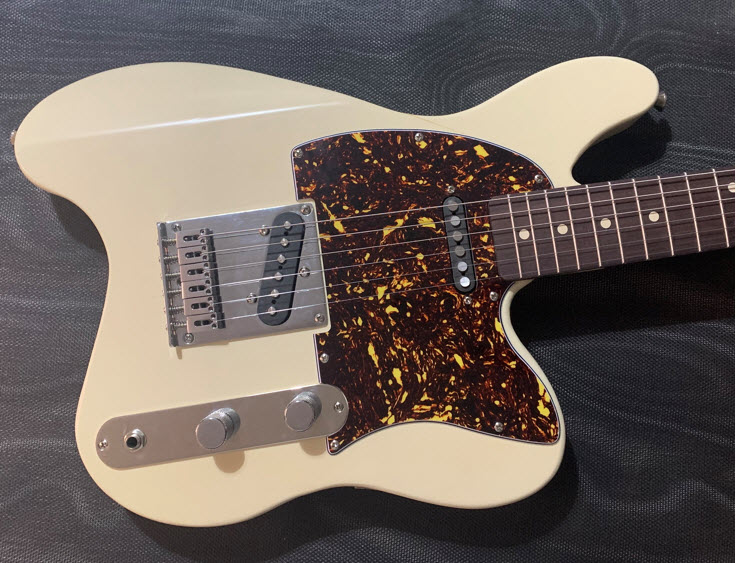
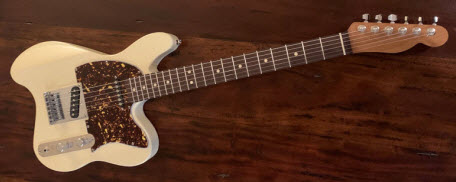
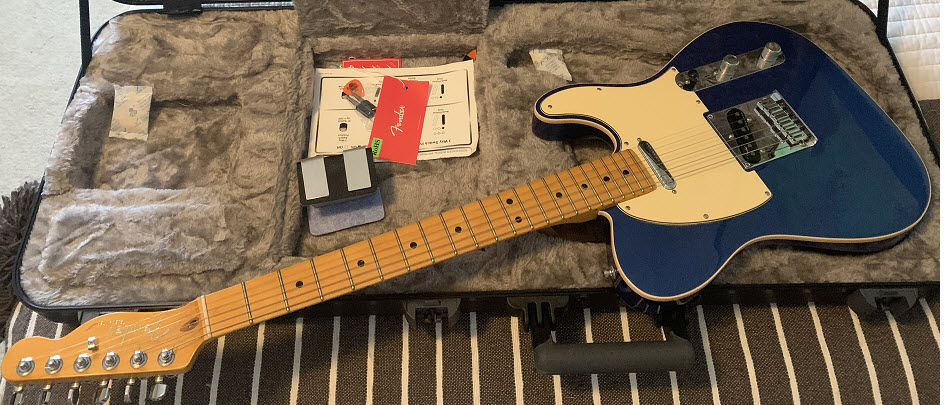
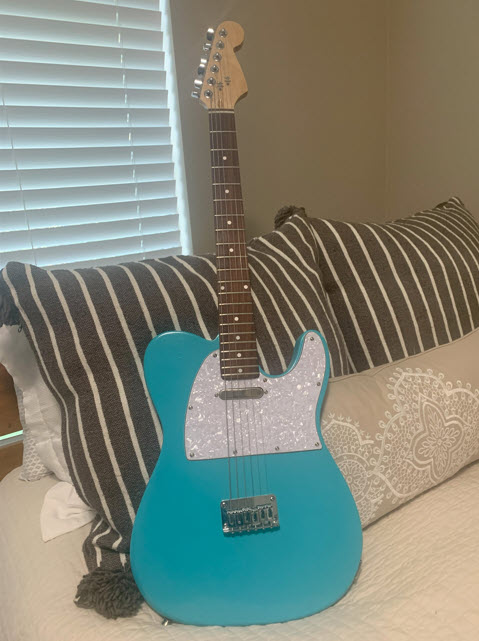
The Wave T started with an
entry-level Squier Telecaster. I then bought a T-style
body blank on ebay, modified the shape of it (more on
this below) and swapped the new body into a
Squier Telecaster. At this point I had $300 into the guitar
including tax and shipping. I really liked how it felt so I
started upgrading. This ergonomic guitar now has a roasted maple Warmoth
neck with stainless
steel frets, GFS Fatbody neck pup, CTS pots, and
deluxe Fender locking tuners (all low post). I like it so much that
my fancy Tele stays in its case most all of the time. That
being said, I'm right at $800 into the Wave T guitar (not
including the labor) so it's not cheap.
Starting with the relatively inexpensive T-style
platform helps, but replacing almost everything with premium parts requires some dough.
|
|
|
|
|
|
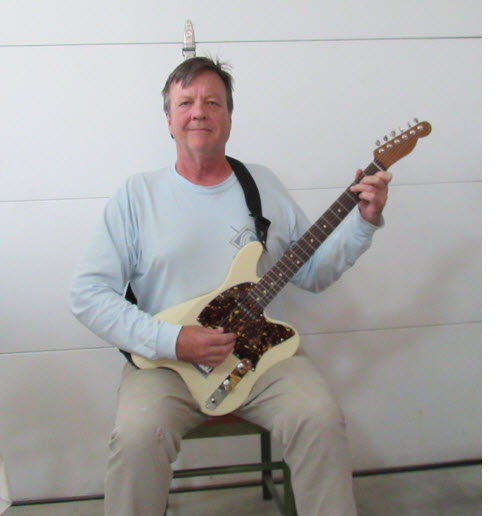 |
I need to find a better looking
guitar model, but this image shows why the Wave T ergonomic guitar body has
the shape it does. I'm wearing a strap, but it's not
supporting the weight of the guitar in this position. There's a ton of
information
online about proper ergonomic guitar playing posture so I won't go into
that, but as summarized above, I wanted the following
posture from my ergonomic electric guitar project while sitting: 1.
Back straight and feet flat on the ground
2. Weight
of guitar distributed on right and left legs
3.
Guitar neck at 45 degree angle. This
is pretty much the standard classical guitar posture,
but easier to achieve because a solid body electric guitar does
not have the size and
shape constraints of an acoustic guitar. There is no need for
a foot stool, guitar rest, support, etc. with the Wave T. |
|
|
|
|
Note how the guitar is in the same position relative
to my body when I am standing as when I am
sitting. That's one of the ergonomic design goals. The weight balance of the guitar feels fine in
this position, though the total weight at 8 pounds is on the
heavy side for contemporary T-style guitars.
I
noticed when I was playing, and I can see it in these
pictures, that my right shoulder is turned a few degrees
forward and my left shoulder is turned the same amount
backwards. It would more "perfectly" match the
"back straight" ergonomic design goal if my shoulders weren't turned at all, but
my right arm has to get around the guitar somehow. I could turn
my body straight and rotate the guitar so its body is parallel with my right forearm, but
that moves my left hand too far forward and away from my body. It
looks like the slight turn of the shoulders is simply a consequence
of playing in the classical position. A thinner body on
the guitar (like a Parker Fly) would help ergonomically, but ultimately the guitar strings
are straight and have a fixed length so I can't curve that
part of the guitar around my body. I think what I have is
about as good ergonomically as the Wave T is going to get.
|

|
|
|
|
|
 |
My ergonomic electric guitar project started during covid when I decided to learn to play guitar
with all the time I would have at home. I bought this fancy
blue guitar and started practicing every day. At first I sat in the "folk" position with the guitar on my right leg, but
after a month or two my back started hurting. My
first strategy to address this was to play standing, and
that did help my back, but I got tired of standing all
the time. I want to be able to play standing and
sitting. I also don't want my neck and shoulders
supporting the weight of the guitar when I am sitting. |
|
|
|
|
After a bit of research in guitar
ergonomics, I learned
that the classical playing position with the guitar
resting on both legs might help my back issues, so I
gave the classical playing position a try.. Unfortunately,
my fancy blue guitar didn't sit on my left leg very
well so I tried a footstool, and then a little cushion,
but ultimately I made a rest that worked pretty well. It
is made of aluminum, plastic and felt,
and has sandpaper glued on the bottom that prevents the guitar from
slipping around on my leg. You can see the rest on the guitar's
lower horn in the image at the right. The rest
definitely helps raise the headstock of the guitar to
improve its ergonomics in the classical seated position. My son plays
guitar and plays in the folk position (like most
people). He tells me that this rest makes his
guitar more comfortable for him to play. The rest gives
the guitar more offset and a higher tilt angle, both
good things in the world of guitar ergonomics, so it is logical that is makes the guitar more
comfortable while playing folk-style. |

|
|
|
|
|
 |
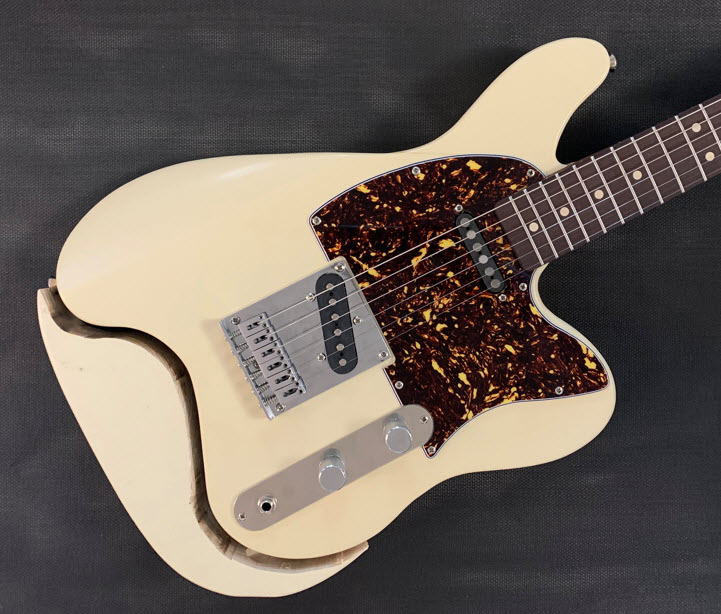
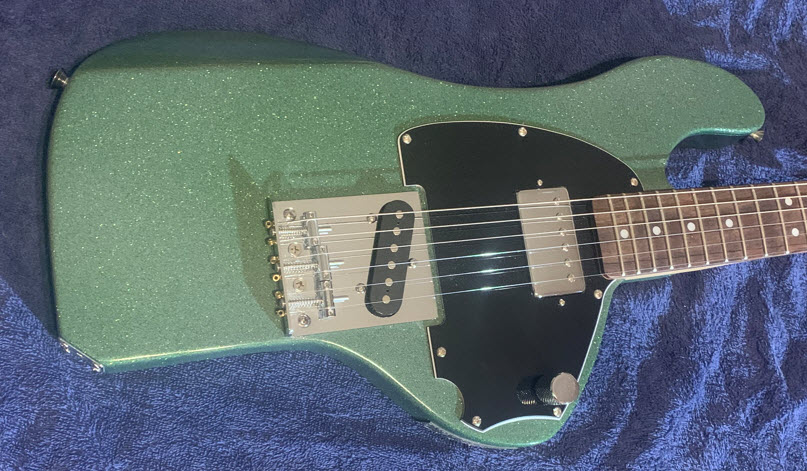
Here's an image of the Wave T
ergonomic electric guitar sitting
on top of the blue guitar. The material added to the bottom of
the Wave T body eliminates the need for the additional rest and the horn on top moves the
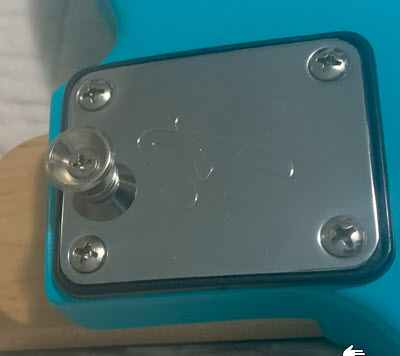
attachment point for the strap about two inches forward. Moving
the attachment point forward makes the guitar
better balanced on the strap and prevents neck dive. I
was concerned about neck dive because I was cutting
quite a bit of material off the back of the guitar. The control plate,
pickup routes, and neck pocket all stay in the same
relative location. That's another reason to start your
ergonomic guitar project with the T-style platform. It
greatly increases your odds of ending up with an
instrument that intonates, frets properly without
buzzing, sounds decent, etc. |
|
|
|
|
The image at right shows the material cut out of
the back of the guitar body. The material cut from
behind the bridge makes room for the right leg and the material cut from behind the control
plate keeps the bottom of the guitar from hitting the
chair. That lets the player sit with their back straight
against the back of the chair without any inference at the bottom of the guitar. There
are two volume controls (one for each
pickup) and the jack in the control plate. Adjusting
the relative volume of each pickup "blends"
their effects. At some point I may change to a single volume and
3-way switch since I'm not really using the blending
functionality. The jack is in the control plate so it
doesn't point downward and interfere with the chair.. The pickups are wired in parallel
and in a humbucking configuration, but the
humbucking isn't fully effective unless both pickups are
set at the exact same volume. That's another reason to
go with one volume control and a switch, though the guitar is pretty quiet
even without the humbucking. I was careful to shield
everything and twist the wires from the pickups to the
control cavity.
|
|
|
Building the Wave T Ergonomic Guitar
|
This next section briefly discusses the techniques I used to build the
Wave T. It does not teach you how to use tools.
PLEASE BE
CAREFUL USING ANY TOOLS. READ THE MANUALS AND INSTRUCTIONS AND ALWAYS
WEAR EYE PROTECTION
|
|
|
|
|
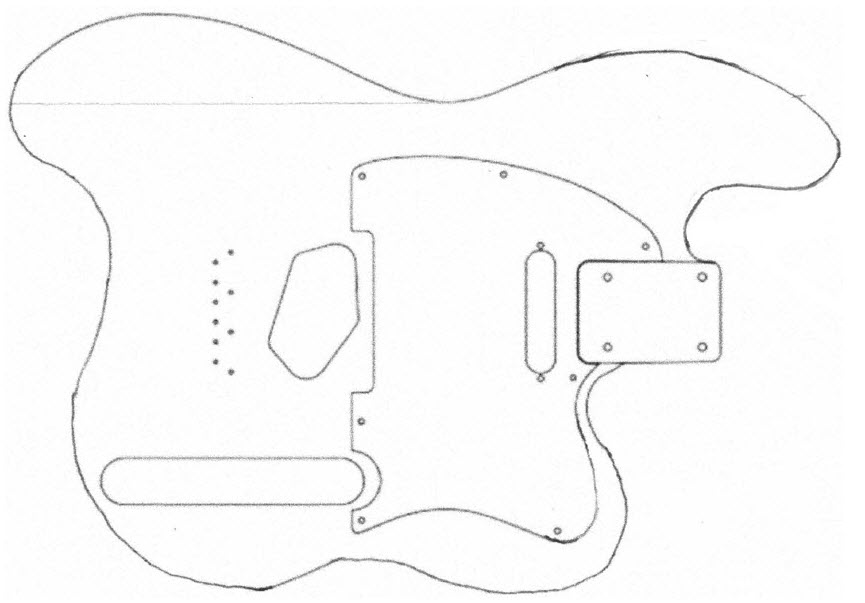 |
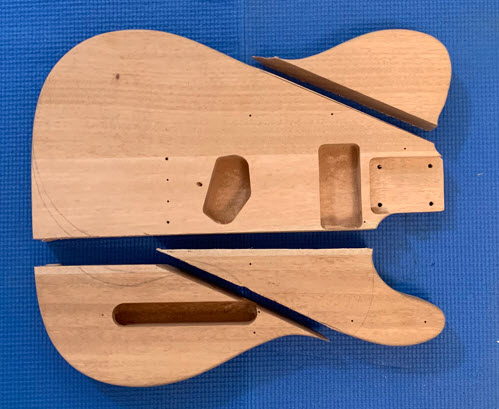
The image at the left shows my sketch
of the ergonomic T-style guitar I wanted to build. Also,
here's a high-res scan of the sketch
if anyone would like to use it as is, or as a departure
point for a different shape. Eventually, I enlarged this sketch and
used it to make the cutout in the back of the ergonomic
guitar body. The shape of the rest of the body was
pretty much decided by my construction technique.
As discussed below, I literally swapped the top and the
bottom horns of the standard T-style. The
pick guard is a standard T-style with the bottom horn
cut off and a little shaping to make it follow the shape
of the modified body a bit better. |
|
|
|
|
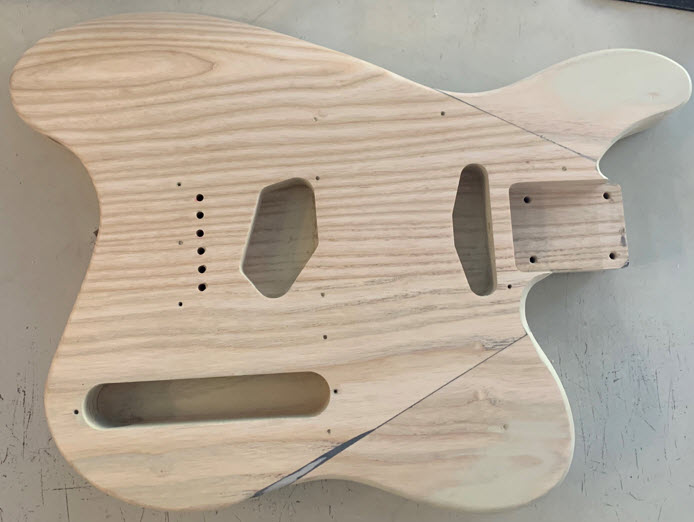
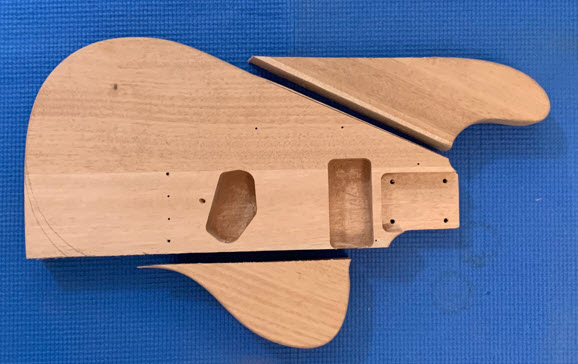
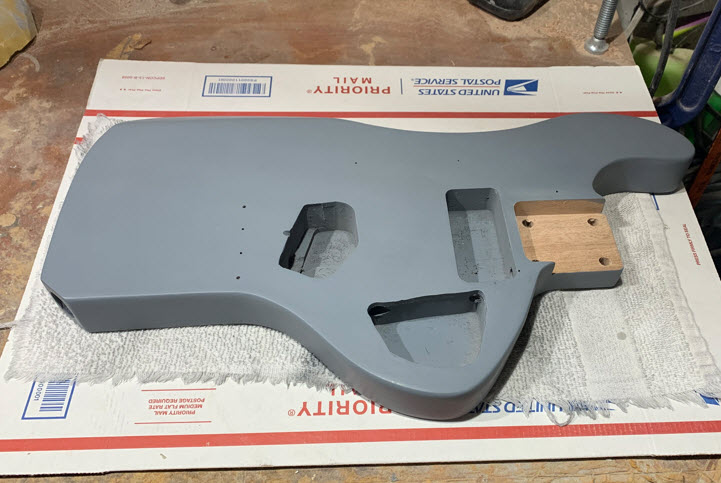
The image at the right shows what the body
of the Wave T ergonomic guitar looked like after making the cuts and
reattaching the horns. I used J-B Weld epoxy and one stainless
steel wood screw per horn to hold them in place. These
joints should be substantially stronger than the wood itself.
I believe the guitar body would split down the middle before
either of these horns broke off. The epoxy makes the joints so
rigid that I can't imagine any increased damping or
deleterious sonic effects. I can supply more
detail if you want to build something similar to this
guitar.
Email me at rich.hooper@gmail.com
and we can communicate that way. I also wouldn't mind knowing about
other interesting ergonomic guitar designs. |
|
|
|
|
|
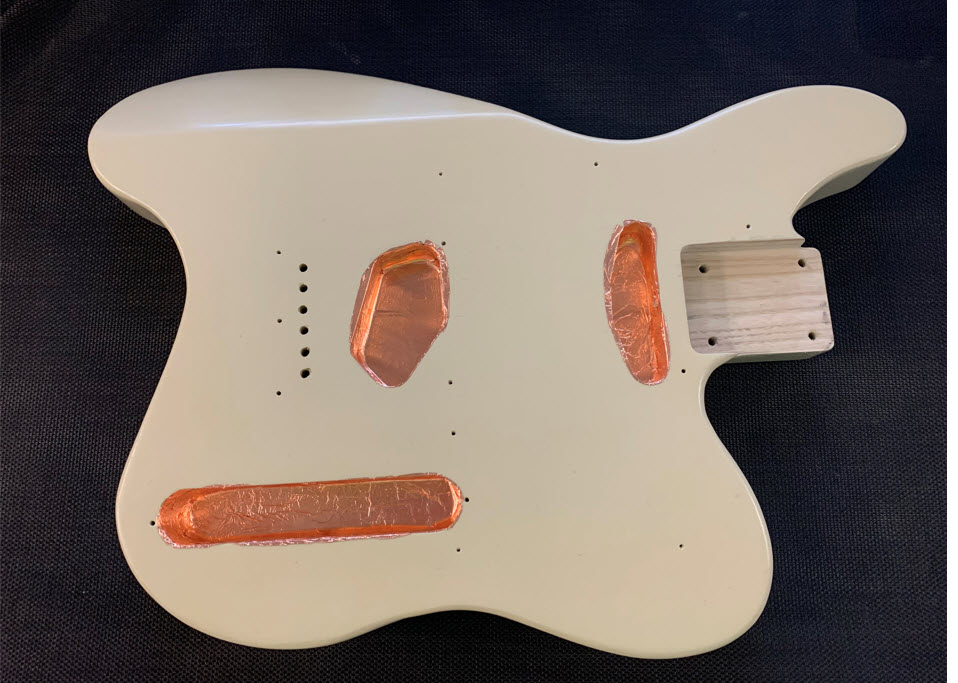 |
Here's the ergonomic guitar body
showing the cavities lined with copper tape. I was
pretty careful with wiring and shielding since the
guitar uses single-coil pickups. I
obviously changed the outline of the body quite a bit to
achieve the ergonomics I was looking for, but the neck pocket, pickup routes, control cavity routes,
etc. are all the same as a traditional Telecaster.. The
body is made from very heavy and dense Northern Ash, but because
it has less total wood than a traditional T-style body, the weight of the guitar came in at
a reasonable eight pounds. I think the hard dense wood
makes it sound heavier than it is, but that could easily
be listener bias. Maybe it just sounds heavy to me
because I know the body is made from heavy and dense
wood. |
|
|
|
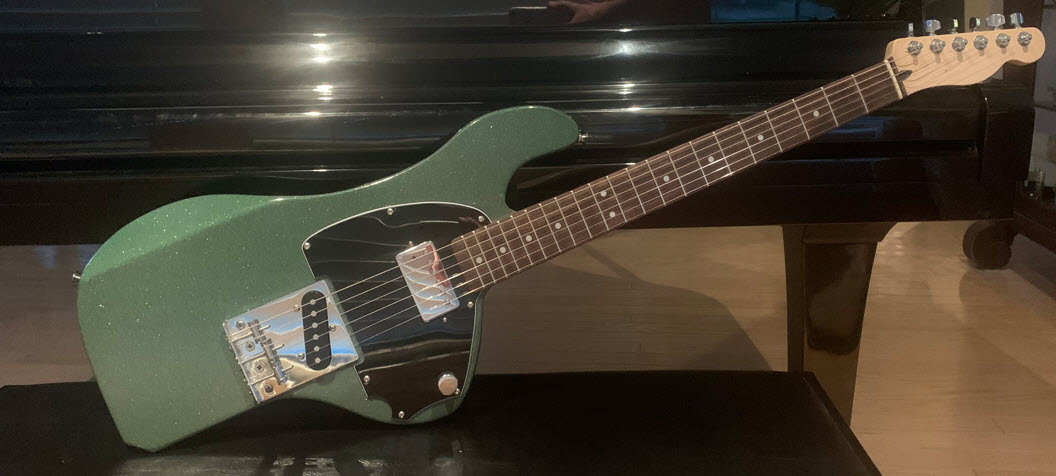
Coral Snake Ergonomic Electric Guitar Project
|
|
|
|
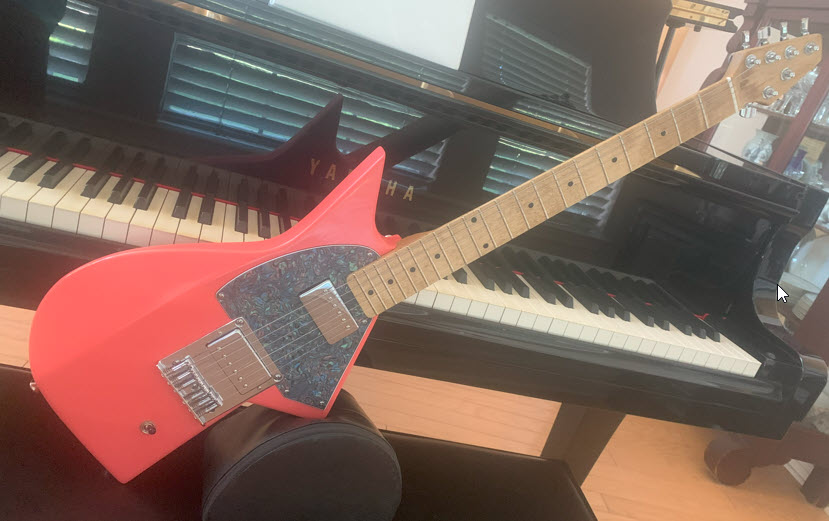
This ergonomic guitar is called the Coral Snake because of the color and sharp corners.
The primary design goal around the ergonomics for this guitar is to make the most possible offset in a guitar body. Think Jazzmaster
but with the point where the guitar rests on your back leg even more towards the back of the guitar. Generally speaking,
the offset moves the center of the guitar body more towards the center line of the player's body.
|
|
|
|
|
|
|
|
|
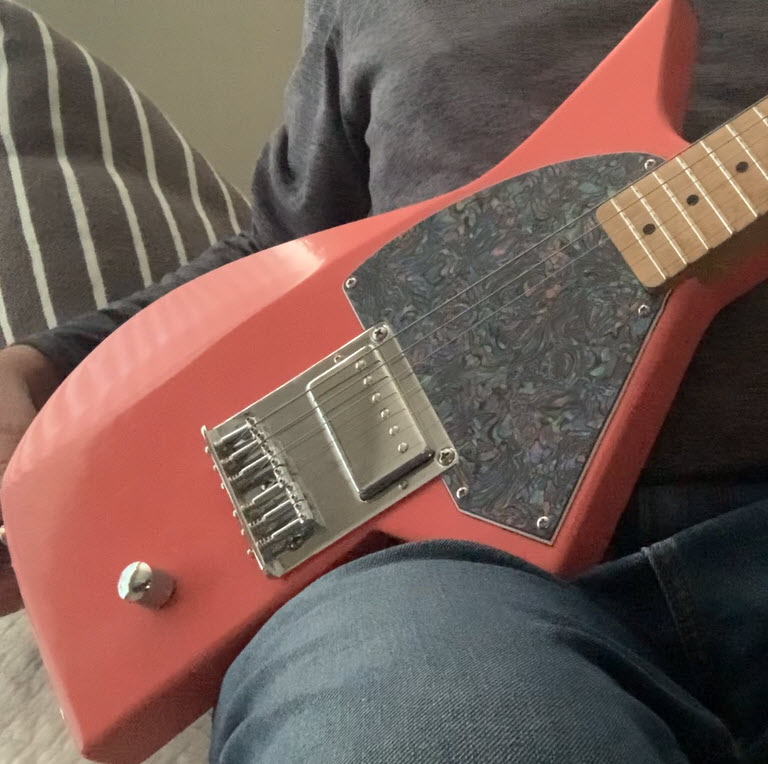
I changed the headstock to move as much weight in the headstock towards the body of the guitar. if
you ever try to make a guitar with maximum offset, you will quickly realize that guitar wants to nosedive. That's why Jazzmasters
have that "lobe" of wood in the lower back of the body. The weight of the lobe helps with the nosedive. The Coral Snake has a 1" x 1" x 5"
solid brass bar embedded in the very back of the body. This makes the guitar balance and not nosedive. |
|
|
|
|
Here is how the Coral Snake sits on my right leg.
Note how the guitar rests in a stable position even when the guitar neck is tilted up at about 45 degrees.
This guitar has a stable rest position for tilt angles of the neck from 25 to 45 degrees.
Also note where the saddles are relative to the centerline of my leg. The Coral Snake actually sits on the leg
very much like a Klein guitar, though the Coral Snake is obviously not headless like a Klein guitar. |
|
|
|
|
|

|
Here is how a Telecaster sits on my leg. I would usually wear a strap while sitting down and have the neck tilted
a little more, but getting to 45 degrees would be stretch. Note how much further back (towards my right side) the saddles are as compared to the Coral Snake.
The offset of the Coral Snake moves the saddles forward (towards my left side). Of course, there's a tradeoff. The offset will make the guitar sit on the
player's leg more comfortably, but it also moves the left hand farther away. This could be a problem for smaller players. |
|
|
|
Seashore Ergonomic Electric Guitar Project
|
|
|
|
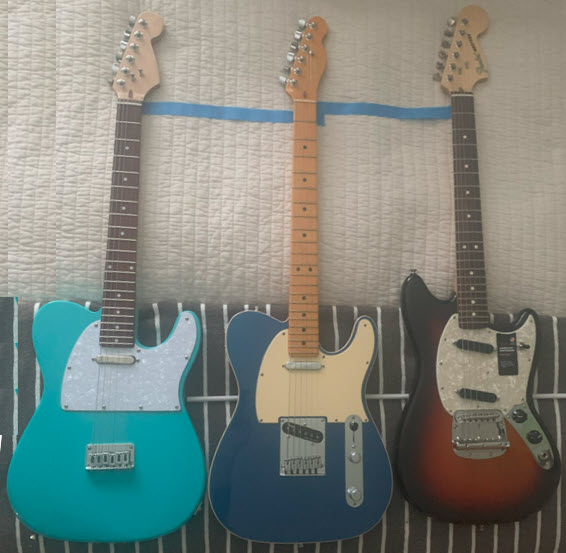
My daughter chose the color for this guitar and it happened to be called seashore. Therefore, this is the Seashore guitar.
My daughter is also the one who inspired this design. She naturally crosses her right leg over her left leg when she plays. This moves the nut of the
guitar farther away from her so I thought I guitar with a 24" scale length would be a good choice (so she didn't have to reach as far with her left hand).
That led me to buy an American Performer Mustang, which has a 24" scale length, but also an offset body. Those two things tend to cancel each other out, so
the shorter scale length didn't help reduce the left hand reach. I built the Seashore guitar with a T-style body, but used a Mustang-style 24" scale length neck.
|
|
|
|
|
|
|
|
|
I think this the prettiest guitar I've built. You can't see in these pictures, but there is a sweeping arm carve.
I also made it 1.5" thick so it is lighter and easier to hold. Of course the bridge needs to move some relative to a standard T-style bridge so the guitar
intonates properly. A standard T-style has 25.5" scale length. I cut the 22nd fret off the end of the neck and then positioned the bridge to intonate properly.
As shown in the image below, it doesn't move the saddles that far back relative to a real Telecaster. |
|
|
|
|
I used a machine screw and a tapped hole in the neck plate to mount the strap button. It's rock solid and the guitar hangs nicely on a strap. |
|
|
|
|
|
|
The image at the left shows the point I was making about a Mustang not actually helping with the left hand reach.
That's a traditional Telecaster next to the Mustang. With the two guitars aligned where they would be resting on the player's leg,
the nut is about the same distance from the player on both guitars. Also, I think the vibrato
makes a Mustang less suitable for junior players, most of whom would benefit from the tuning stability of a fixed bridge. |
|
|
|
|
This shows the Seashore guitar with a 24" scale length is a nice middle ground between a standard T-style 25.5" scale and
a youth guitar with a 22.2" scale. I understand Fender makes 24" scale length Telecasters they sell in Japan. You can also usually find some used
24" scale length Telecasters on Reverb, but they seem pricey to me. |
|
|
|
|
Gumby Ergonomic Electric Guitar Project
|
|
|
|
The design goals of the Gumby Guitar around
ergonomics are the same as have been previously discussed above. After
spending some time with an ergonomic guitar test bench (discussed
below), it seemed to me that the way to get closest to these goals is
to maximize the offset of the guitar. In many ways this is going to be
an offset maximizing exercise. I am also am using the same idea of
sawing off the top horn of the guitar and reattaching it to the bottom
of the guitar and thus increase the tilt. That worked well on the Wave
T ergonomic guitar.
|
|
|
|
|
|
|
|
|
The
image on the left shows the three main cuts made to the
guitar body. The wood that came with this kit is
very soft. It seems like basswood to me, even though the
kit said the body was made of mahogony. That's probably not the
best as tone-woods go, but it's fine for this project
and definitely makes the cutting and sanding easier. |
|
|
|
|
Here are the three main pieces of the
maximum-offset ergonomic guitar body rearranged into their new
configuration. |
|
|
|
|
|
|
I finally got this ergonomic guitar
body re-assembled and primed. It was a lot more work
than my previous ergonomic guitar, the Wave T. There
were two main things that made it harder. The first was
that I sawed away the control cavity and had to recreate
it somewhere. You'll see my feeble routing in the figure
of the ergonomic guitar body at left. I also had to
drill new holes to the pickup cavities, and finally I
had to drill a really long hole from the port for the
input jack, which I also had to drill. The next thing
that made it harder was the counter weight I had to put
in the back of the ergonomic guitar body. For one
thing, I had to find about three pounds of a very dense
material. I happened to have a heavy copper buss bar
left over from a previous project, so I sawed that into
5" pieces. Then I routed a cavity in the back of
the ergonomic guitar body and epoxied the buss bar
pieces into it. Then I sanded it smooth and primered
everything. |
|
|
|
|
Here is the next thing that made this ergonomic guitar project more difficult than the
Wave T ergonomic guitar. I painted the guitar body with
glitter paint! I think a glitter gumby looks great, but the tough part was that the surface of the
guitar body was very rough from the embedded glitter and it took very many clear coats and fine sanding to get a finish that
was shiny for the new ergonomic guitar. I really only did the all the clear coats and fine sanding on the front surface of the guitar.
The slightly rough surface
was actually less sticky against the skin on the inside of my
arm than the shiny surface is after the clear coats. |
|
|
|
|
Here I am with an assembled version
of the Gumby ergonomic electric guitar. It came very
close to meeting the goal of resting against my body in
the same relative position whether I am playing it
sitting or standing. The ergonomic guitar balances
nicely on the leg from about 5 degrees to at least 45
degrees tilt and is way more comfortable to play sitting
than my fancy blue Tele. My daughter, who is smaller
than I am, said she also appreciated that the guitar was
less bulky than a traditional T-style guitar. |
|
|
|
|
|
|
|
|
Design considerations for the Gumby ergonomic
guitar
|
|
|
|
Although I'm generally aiming for an ergonomic
guitar, this guitar is meant to be played in the
"folk" position with the guitar resting on the right
leg when played in the sitting position. The main design goal
for this guitar is for it to rest in the same position
relative to my body whether I am playing it sitting or
standing. In many ways, this is an exercise in maximizing the
offset of the guitar. As a practical matter, maximizing offset means
that is not reasonably possible to balance this guitar using
wood, As you can see in the image, almost the entire
guitar is in front of where the guitar rests on the player's
leg. Unless the body is made
substantially longer, it can only be balanced by putting
concentrated weight at the back of the guitar. As will be discussed
below, this weight can be added such that the guitar will
be perfectly balanced. By saying "perfectly
balanced," I am specifying 3 conditions:
1. The
guitar must not tend to tilt forward or backward at any angle
of the guitar neck
2. Condition 1. must be true when played
sitting with the guitar resting on the right leg
3.
Condition 1. must be true when played standing using a typical
guitar strap
Condition 1. acknowledges that the optimal tilt angle for the
guitar will vary depending on the player. For example, if you
look up the optimal tilt angle with regards to
ergonomics for a classical guitar player it is 45
degrees. However, my understanding is that classical guitar
does not involve using the thumb to fret notes. In rock guitar, and
many other popular guitar styles, players quite often use the
thumb on their fretting hand to fret notes. Since the thumb is
opposed to the fingers, a higher tilt angle that is
ergonomically better for fretting with the fingers will
necessarily be ergonomically worse for fretting with the
thumb. Conditions 2. and 3. should not vary
depending on the guitar player. No one likes a guitar to neck
dive or otherwise move on its own. |
|
|
|
|
|
 |
These are just some images to help
decide on the smaller ergonomic and aesthetic design
elements. The first being that something needs to be
done about that sharp corner at the bottom back of the
guitar. The top image at left shows what it will look
like if the corner is simply rounded and the bottom
image makes the bottom of the guitar curve
symmetrically with the top of the guitar. I think
I prefer the way the top image looks and it would be
easier to cut and sand. There also
needs to be a generous arm carve. It could be something
like the carve on a Strat-style guitar, but I like the
way the carve on the Wave T ergonomic guitar feels, so I'll probably go
with that. I also like the way the straight line of the
carve runs parallel with the lines on the bridge and
control plate. |
|
|
|
|
I could easily leave the top of the guitar with a
straight line like it has in the two images above. Usually
the top horn of the guitar is extended to make the guitar
balance better on a strap, but with all the weight this guitar is
going to have embedded in the back of the body, it won't have
any ergonomic issues with neck dive when it is hanging on a strap. Both of
the images at the right incorporate long top horns that would
be there primarily for aesthetics. I can't decide whether I
like them or not, but I really don't want to add weight in
front of the rest point, so these long top horns may not be
part of this design. |
|
|
|
|
|
 |
Here are some shorter top horns.
These look better to me than the long top horns. I'll
probably get another opinion or two regarding
aesthetics, but in terms of ergonomics, less is better.
Also I like the looks of the Steen guitars and they have a straight cut all the way to the
neck like this with no top horn. The Steen guitars also have a fair amount of offset, so I'm sure Mr.
Steen was interested in keeping mass out of that
area.. |
|
|
|
|
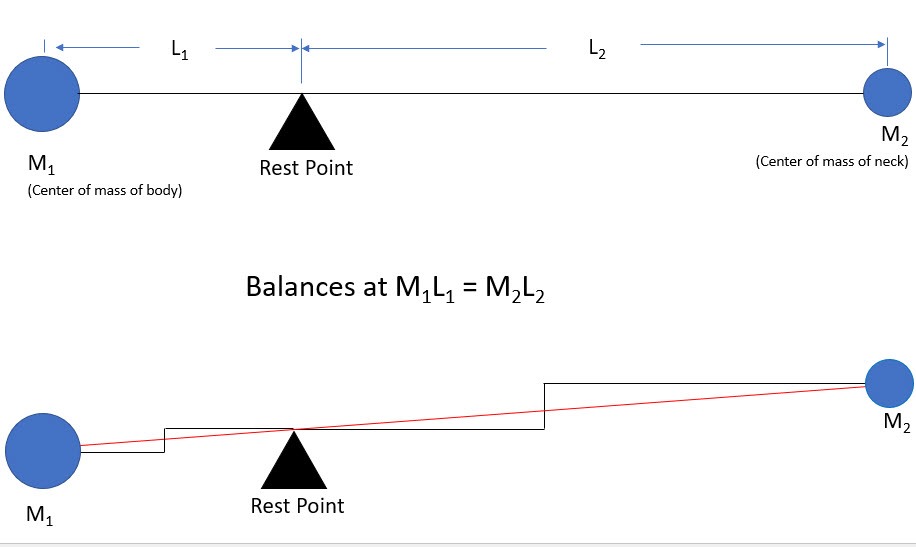
Generally, we would like the ergonomic
electric guitar be balanced around the point where the
guitar is resting on the player's leg, and we would like the
guitar to stay balanced at varied tilt angles. As shown at the
top of the image at the right, this happens when L1M1
= L2M2. In a guitar, however, the neck
is raised above the point where it rests on a player's leg, so
balancing a guitar is more like the situation depicted in the
lower part of the image. The point to notice is that to
properly balance the electric guitar ergonomically, the center of mass of
the body needs to be on that red dashed line that goes below
the centerline of the guitar. This is why offset guitars
typically have a long body that "droops" at the back
(think Jazzmaster). The greater offset of these guitars gives
weight in the neck and headstock more leverage, so the body needs to get longer and lower to balance
the guitar. |
|
|
|
|
|
 |
It was so helpful to have a prototype
when I was building Wave T, that I just cut the entire
bottom off the body of that Squier Telecaster right
below the bridge and now I
can use it as a test bench for experimenting with
electric guitar ergonomics. For example, sliding
the bottom piece backward and forward changes the
offset. I also can extend the back of the guitar and add
weights to vary the balance. Finally, I can move the top
horn back and forth to change how the guitar hangs from
a strap. As you can see in the image, I am simply using
duct tape to attach the various pieces where I want
them. That is easy and works fine. I also have a trailer hitch
hat I am
using as a counter balance. That also works fine and I
think it's funny because it looks to me like there is a giant
strap button on the back of the guitar! Based on my experiments so far with
the ergonomic guitar test bench, I am leaning towards a
rest point around 6 inches. That is about 50% more
offset than a Jazzmaster and the Jazzmaster is already
an "offset" guitar. I'll definitely be playing
the test guitar for a while before I finalize the offset
and start cutting on the body for the new Off T
ergonomic electric guitar. |
|
|
|
|
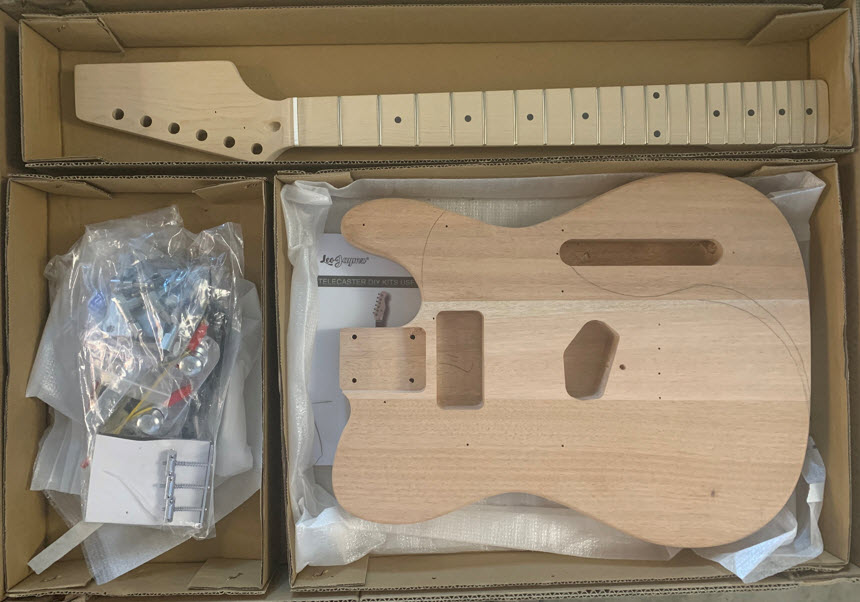
For this ergonomic maximum offset guitar
building project, I'm going to start with this kit I bought
online. It cost me $113 delivered, including tax, and has
everything required to build an inexpensive T-style guitar. I also
saw a T-style body for about $50 delivered, including tax.
That means for less than $200 you can experiment with a prototype body
for testing ergonomics and then build and assemble a completed guitar
when you are satisfied with the body shape. You should be able
to keep it below $200 starting with a used, entry-level Squier,
rather than the kit, as well. If you like the feel
and the ergonomics of the guitar after that, it's easy to start
upgrading components. |
|
|
|
|
|
|
|
copyright notice
|
|
|